

It wasn't really all that hard, it just hadn't been done before. I've had the idea for a while, just never got around to figuring out how I was going to do it. I've been looking around for parts for a year or more. Others have done similar concepts: trying to get cooler air into the engine. They have done the opposite of what I have done, though, by piping air up into the engine compartment to the air filter. I physically relocated the air filter OUT of the engine compartment altogether. The net result? No more superheated engine air gets into the combustion chamber so I always have nice fresh air. :-)
I'll prologue my description by saying that the materials I used are "temporary" as I live on a budget and for testing thigs out (as it's never been done this way before) I used readily available materials. Total cost was probably about $40 plus day's work in the garage. But it'd take less time if I did again since the learning curve is obviously behind me. Am I happy with the results? Hell yeah!
Also, one other note: This mod in its presented and installed design will ONLY work for the 5-speed non-turbo models Stealth & 3000GT. It will not work on the Turbo models as there is obviously an intercooler where I moved things, and the non-turbo's automatic tranny almost entirely blocks the path I used to re-route the air path. That in mind......
|
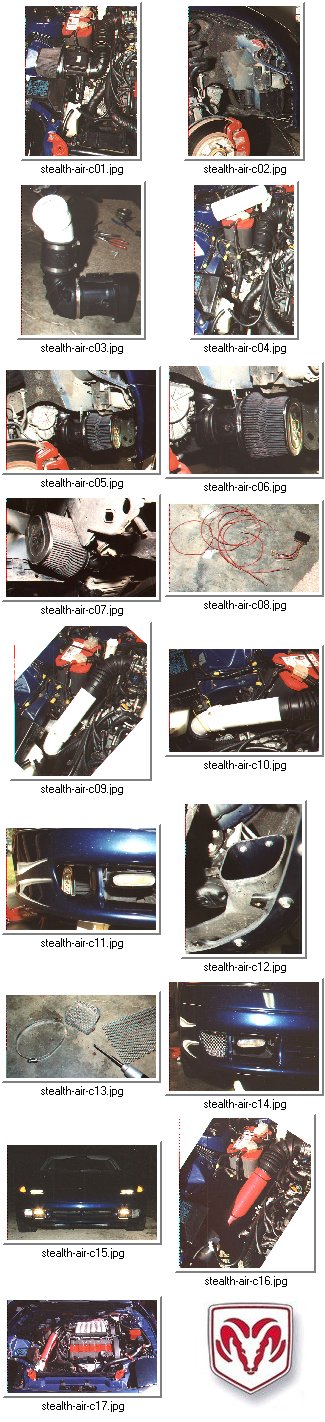
Picture 01 shows the intake system in it's "stock" form. I have had the K&N FIPK conical filter installed since winter of 96/97. Removed the resonator bottle in 1997. Neve rhad any problems with either mod. Resonator bottle made a great improvement in the sound when under wide open throttle. Picture 02 shows the passenger fronjt wheel well with all the well lining removed. The round silver part above/behind the brake caliper is the tranny. Picture 03 is the MAS with part of the new piping. I used all of the stock piping in the design (not discarding any of it). This picture shows the MAS with the angled adapter piece, converting the rectangular output of the MAS to the 3" round size. I attached a 3" diameter by 3" length rubber PVC connector to the stock angled piece and a 3" 45° piece of PVC piping to the other end. The PVC is at about a 135° angle away from the MAS (i.e., 45°s past a right angle to the MAS). The narrow end (female) of the 45° PVC is in the rubber connector, with the wide end (male) at the top. The extension pipe will go here. Picture 04 I have removed the stock box, leaving the stock piping coming off the throttle body. Also shows the piece of PVC pipe that I will use. It is a 10.5" long piece of 3" white PVC pipe. Finely sanded on the edges. NOTE: I removed the metal ring inside the open end of the stock pipe leading to the throttle body. Pictures 05 & 06 show the MAS and filter installed. The MAS through the 45° PVC must be installed first. I drilled a hole in the metal about 1/2" up 3" in front of where the well liner pieces attach (i.e., where it goes from black to blue in the pic). I used 2 custom brackets to hold it up. They both attach to the MAS using the screws that are already there (and holding the K&N adapter ring). The rear bracket that you see is from my 20 year old Mechano set, it's about 3" long. The front bracket was made with a couple 90° angle brackets (1" steel angle supports from Home Depot with the holes drilled a tad larger) and a 3" metal strip. Guess I shoulda taken pics of the actual brackets, eh? :-/ Once the MAS was suspended, I added the K&N. Picture 07 is a view of the K&N fronm the underneat front. Notice how nicely it fits in there. I have reinstalled the well liner piece behind it. To help prevent water from spashing up on it from the front tire, I attached to the inside (filter side) of the well liner two pieces of sheet aluminum. Only one is installed in the picture, the other went below it. These cover the "vents" but keep any water from coming off the front tire onto the filter. Picture 08 I had to extend the MAS adapter plug as it wouldn't reach all the way down to where the MAS is now located. So I cut all the wires and pliced in an additional 15" of 18 gauge wire. Wrapped it in black wire loom and taped it with black electrical tape. It's one of those at the top of Pic 10. Pictures 09 & 10 show the 10.5" PVC extension in place. It connects to the 45° angled PVC. The other end has the stock rubber hose inserted about 1" into the PVC extension. Again, I had to remove the metal ring that was inside the stock hose attached to the throttle body. Pic 10 shows that I am using a super-duty zip-tie to hold everything up. This is partially necessary to keep the pipe from interfering with the shifter levers on the tranny. I switched to a red zip-tie and will eventually install some sort of metal bracket support. That'll come when I get the permanent hosing (be it rubber or aluminum, haven't found what I'm looking for yet). Picture 11 shows the K&N tucked nicely in there, as it's visible from the front. When all was actually said and done, looking directly straight into the intercooler chamber, you barely see it. It is actually a little to the right of the actual opening (good to keep to mcuh water from waching in on it when it's raining). This pic was taken at a mild angle to actually show the filter. Pictures 12 - 14 I wanted to add some kind of shield or grate or something to block big sh!t from flying in there at 70 mph and damaging my filter. But I had a helluva time finding something to use. I scoured multiple stores, car magazines, online. Ultimately I finally found what would be the best (and really the cheapest too) option. Gutter grate!! Pic 12 shows the inside of the front fascia intercooler intake opening. The two screws in it were from when I had auxiliary lights there (they got stolen). Pic 13 is me having cut the gutter grate (got a 10x36" piece for like $1.19) and shaping it to fit around the inside of the intercooler intake inlet (can we say "in"?!). I used a pair of screw-adjust hose clamps to tighten it onto the inside. Pic 14 shows it installed. Pretty cool, eh? I love my craftiness sometimes :-) Picture 15 I had to have everything in balance so I installed a shield on the drive rside as well. Looks awesome with the grate on both sides. I thought about the middle but haven't figured the way to attache it just yet. Maybe in the future... Picture 16 shows the system in it's completed form. I added 2" red electrical tape to cover the white PVC. Like I said, this was done while it was in Test Mode. I'm definitely leaving this mod installed. Am currently looking around for permanent piping. It will ultimately end up being red. Picture 17 is a full shot of my engine with the custom intake as well as the other detailing I've done so far. I have pictures of that which will be posted very soon. I'm very happy with how it looks under there. Still got more work to do for sure, though. I'll keep my page posted as things change. Net Result? Well, I personally think it helped a hair. And if nothing else, it looks awesome under the hood and it's totally unique. You know me, gotta keep my car one in, well, one in all of em! :-) |
Thanks for visiting! Please send me an email if you have any questions or comments at suthnr@geocities.com Back to my Modifications Page | |